This is featured post 1 title

Lorem ipsum dolor sit amet, consectetur adipisicing elit, sed do eiusmod tempor incididunt ut labore et dolore magna aliqua. Ut enim ad minim veniam, quis nostrud exercitation test link ullamco laboris nisi ut aliquip ex ea commodo consequat.

This is featured post 2 title

Lorem ipsum dolor sit amet, consectetur adipisicing elit, sed do eiusmod tempor incididunt ut labore et dolore magna aliqua. Ut enim ad minim veniam, quis nostrud exercitation test link ullamco laboris nisi ut aliquip ex ea commodo consequat.

This is featured post 3 title

Lorem ipsum dolor sit amet, consectetur adipisicing elit, sed do eiusmod tempor incididunt ut labore et dolore magna aliqua. Ut enim ad minim veniam, quis nostrud exercitation test link ullamco laboris nisi ut aliquip ex ea commodo consequat.

This is featured post 4 title

Lorem ipsum dolor sit amet, consectetur adipisicing elit, sed do eiusmod tempor incididunt ut labore et dolore magna aliqua. Ut enim ad minim veniam, quis nostrud exercitation test link ullamco laboris nisi ut aliquip ex ea commodo consequat.

This is featured post 5 title

Lorem ipsum dolor sit amet, consectetur adipisicing elit, sed do eiusmod tempor incididunt ut labore et dolore magna aliqua. Ut enim ad minim veniam, quis nostrud exercitation test link ullamco laboris nisi ut aliquip ex ea commodo consequat.

How to Repair a Toilet

0 comments


The toilet is one of the most important fixtures in your home. Although toilets are sturdy and reliable components of the plumbing system, it’s a rare homeowner or apartment-dweller who never has any problems with a toilet. Clogging is perhaps the most common toilet trouble, but it is far from the only one. The tank, for example, can make all sorts of strange noises, or water can run continuously. Fortunately, most toilet troubles can be fixed by a do-it-yourself plumber.
If you're a do-it-yourself kind of person, learning some quick fixes can keep you from calling the plumber. In this article, we're going to explain various issues related to repairing toilets.


    Replacing a Toilet Seat

    The easiest toilet repair task is replacing the lid and seat. There are so many styles of replacement seats available that you should have no trouble finding one to match any bathroom color scheme or motif. Most modern toilets are manufactured in two standard sizes, and replacement seats are made to fit them.

    Once you have the right size seat, remove the old one. Remove the two nuts on the hinge and lift your old toilet seat up and out. A common problem is that the nuts securing the toilet seat may be rusted or corroded. The nuts on some toilet seats are recessed and practically inaccessible, making the job even more difficult.


    A new toilet seat can be installed by inserting the two bolts, slipping on the washers, and tightening the nuts. Be careful not to over-tighten the nuts or the seat might be hard to remove later.

    What’s the solution? If you can get to the fasteners relatively easily, apply some penetrating oil to help loosen them. Give the oil plenty of time to soak in. Use a wrench, or, if you can’t reach the nuts with a regular wrench, a deep socket wrench. Be sure you don’t use too much force; if the wrench slips off a stubborn nut, it could strike and crack the tank of the bowl or anything else it happens to hit.

    Sink, Tub and Drain Troubleshooting Guide
    Problem
    Possible Cause
    Solution
    Water in tank runs constantly
    Float ball or rod is misaligned.Bend float rod carefully to move ball so it will not rub against side of tank.
    Float ball contains water.Empty or replace float ball.
    Float ball not rising high enough.Carefully bend float rod down, but only slightly.
    Tank ball not sealing properly at bottom of tank.Remove any corrosion from lip of valve seat. Replace tank ball if worn. Adjust lift wire and guide.
    Ballcock valve does not shut off water.Replace washers in ballcock assembly or, if necessary, replace entire assembly.
    Toilet does not flush or flushes inadequately
    Drain is clogged.Remove blockage in drain.
    Not enough water in tank.Raise water in tank by bending float rod up slightly.
    Tank ball falls back before enough water leaves tank.Move guide up so tank ball can rise higher.
    Leak where tank joins toilet bowl.Tighten nuts on spud pipe; replace spud washers, if necessary.
    Ports around bowl rim clogged.Ream out residue from ports.
    Tank whines while filling
    Ballcock valve not operating properly.Replace washers or install new ballcock assembly
    Waster supply is restricted.Check shutoff to make sure it's completely open. Check for scale or corrosion at entry into tank on valve.
    Moisture around fixture
    Condensation.Install foam liner, tank cover, drip catcher or temperature valve.
    Leak at flange wax seal.Remove toilet and install new wax ring seal.
    Leak at bowl-tank connection.Tighten spud pipe nuts; replace worn spud washers, if necessary.
    Leak at water inlet connection.Tighten locknut and coupling nut; replace washers and gasket, if necessary.
    Crack in bowl or tank.Replace bowl, tank, or entire fixture.


    If all else fails, you’ll have to cut off the bolts with a hacksaw. To protect the bowl’s finish, apply tape to the bowl at the spots the hacksaw blade is likely to rub against. Then insert the blade under the hinge, and saw through the bolts. Be extremely cautious in using the saw—a careless slip with a hacksaw can crack the fixture just as easily as a blow with a wrench.

    With the nuts removed or the bolts cut, you can remove the old seat without further difficulty. Clean the area before installing the new seat. The new on can be installed by inserting the bolts and tightening the nuts. Be careful not to over-tighten the nuts, as you may want to replace this seat someday as well. If you live in a rented apartment and install a new seat that you paid for yourself, be sure to keep the old one. When you’re ready to leave, you can replace the new on with the original and take the new seat with you.

    If the toilet lid and seat are still in good condition, but the small rubber bumpers on the bottom are in bad shape, you can buy replacement bumpers at the hardware store. Some bumpers screw in; others must be nailed or glued into place. Whichever type you have, try to install the new ones in holes that are close enough to conceal the original holes.


    Clearing a Clogged Toilet

    You can generally clear a clogged toilet with a plunger, otherwise known as the plumbers’ friend. Make sure that there’s enough water in the toilet bowl to cover the rubber suction cup, then work the handle of the plunger up and down. If there isn’t enough water in the bowl, do not flush the toilet; flushing a clogged toilet will just cause the bowl to overflow. Instead, bring a pan or pot of water from another source to supply the water you need to cover the plunger cup. There are two types of plungers, and the one with a bulb-type head is especially effective for toilets. Some types have a fold-out head that’s designed for toilet use.

    Usually, whatever is blocking the toilet drain is not very far away. If the plunger’s action doesn’t dislodge the clog, you can try to hook the blockage and pull it free. A wire coat hanger can sometimes do the job, but it is really a substitute for the closet or toilet auger.


    Before using the plunger, make sure there’s enough water in the toilet bowl to cover the suction cup. Pump the plunger to dislodge the clog.

    The auger has a long sleeve or tube to guide the snake and auger hook into the trap. A crank on the end enables you to turn the hook in the drain or trap. Here’s how to use it.

    Step 1: Insert the auger into the toilet trap and turn the crank until it feels tight. This means that the snake has twisted its way to and into the blockage.

    Step 2: When you pull in the auger, you should be able to remove whatever is clogging the toilet. If you aren’t successful, try the closet auger several more times. In some cases, you may have to resort to pushing a regular plumbers’ snake through the blockage.

    Step 3: When all else fails, the toilet may have to be removed from the floor and turned upside down so you can get a blockage. This is not what anyone would call an easy job, so you should give the simpler methods as good a try as you can before you remove the toilet. But removing the toilet is not beyond the capabilities of the average do-it-yourselfer, and this procedure is explained in the forthcoming section.


    The closet auger has a long sleeve to guide the snake and auger hook into the trap. A crank enables you to turn the hook and dislodge the blockage.

    How to install skirting boards

    0 comments


    As a finish to the base of walls, skirting boards are more than practical, they’re also decorative. In fact, skirting boards, like crown moulding, are one of those small details that can make all the difference to a room. So often they are given very little attention but they are offer architectural detail that defines the character and style of an interior.


    Originally designed to fill the gap between wall and floor and protect walls from dirt and damage, skirting boards have evolved to provide a more decorative finish to a home. While older homes may feature skirting boards that are ornate and elaborate in design, modern skirting boards are simple and elegant.
    Traditionally manufactured from timber, newer materials allow for easier installation by the do-it-yourselfer. SupaWood or MDF is being used increasingly for moulding and skirting, as is PVC [ Polyvinyl Chloride] but the harmful effects of the latter on the environment may soon see a reduction in the use of this material. The price of skirting board will obviously depend on the material that you choose, but shop around for the best price.


    GOOD TO KNOW
    Material, style, price, and ease of installation – these are the 4 factors that you have to consider when buying skirting boards for your home.

    HOW TO INSTALL SKIRTING BOARDS
    In this article we are going to show you how to replace standard skirting boards with skirting boards that provide an attractive finish and architectural detail to a room.

    Preparation
    It is important to measure up the room before you start so that you can order enough skirting to finish the project. There is no guarantee that you will find the same stock if you need to run back to collect more pieces.
    Starting at one edge on the longest wall, measure the length to be cut and add an extra 30 centimetres onto this measurement to allow for the angled ends. For aesthetic reasons it is preferable to have long, continuous strips of board rather than cut several small pieces with visible joins.

    GOOD TO KNOW
    Allow extra length in case you make any boo-boos along the way!

    Step 1
    Use a hammer and chisel to remove the old skirting. Place the chisel at the back of the skirting and gently tap with a hammer until the chisel fits behind.
    Repeat this along the length until you are able to pull the existing board away from the wall.
    Use pliers to remove any nails left behind.


    GOOD TO KNOW
    Don’t forget to allow for any obstructions that prevent you from installing skirting boards, such as door frames, pipes, etc.

    Step 2
    Vacuum or sweep the area so that it is free of dust and debris before installing the new skirting.


    Step 3
    To join sections together at corners (inside or outside) you need to cut the ends of the board at a 45-degree angle.
    A good way to work out what needs to be cut and where, is to draw yourself a diagram showing all the corners that need to be cut, and this will avoid any confusion when cutting the various angles.


    GOOD TO KNOW
    While a compound mitre saw is the easiest way to cut angles, you can also use a mitre saw, jigsaw that is fitted with an adjustable plate, or a mitre box and backsaw*. However, if you are fitting skirtings of a height exceeding 8 centimetres, a mitre box will be too small.
    A backsaw, or tenon saw, has a reinforced ridge along the top of the blade to prevent bending while you cut.


    Step 4
    Apply a thick zig-zag bead of adhesive to the back of the board and then hold the board at the bottom edge and angle slightly away from the wall.
    Press bottom edge first against the wall and then apply pressure to the entire board. By doing it this way you create suction between the adhesive and wall for better tack between the two surfaces.


    GOOD TO KNOW
    If you are using No More Nails, this adhesive does not need nailing to hold it in place until the adhesive cures.
    You can also use No More Nails as a gap-filler along the top of the skirting, to give a professional finish to a job well done.

    Finishing
    Apply three coats of clear or tinted Woodoc 10 to your new skirting boards to provide protection, or if you prefer, paint with water-based acrylic.


    You will find a fairly large selection of pine and SupaWood skirtings at your local Builders Warehouse, in varying heights and profiles.
    Select one that would look good in your home. If you plan to paint skirtings they will need advance sanding with 180-grit sanding. You will find it easier to sand and paint the boards before installation, adding any touch ups once installed.

    Newest Design Modern Living Room

    0 comments


    newest design modern living room
    Newest design modern living room visualizations flawless consistency, clean lines, and widespread simplicity compose this wonderful modern living room as one of tremendous design guide. After fleeting look at the newest design modern living room picture slowly maybe you will get a little different reference to be excecuted on your own design.
    Newest design modern living room evoke prosperous facade involve color dispersal, resources connection, design blend relationship and design plan approaching, which the entire piece join simultaneously to compose magnificent modern living room. Next modern living room design summary commonly was bring different spirit to environment neighboring which is formed with superior design.
    The modern living room designer proficiently places simultaneously magnificent summary harmony into a blending to construct good design modern living room. Deploying smart design plan technique and meeting point design function is the key reason of this newest design modern living room develop into one of beautiful modern living room design.
    Design meeting point to be signed about this cheerful modern living room is affluent tone alongside unsophisticated design theme and resources option. This attractive newest design modern living room we think proficiently mixing smart modern living room design plan, nice design fleeting look, component range, dominant distinctive of pattern decoration and design issue harmonization.
    Newest Design Modern Living Room Related posts

    Smart Design Modern Living Room With Library And Floor Lamp

    Smart Design Modern Living Room With Library And Floor Lamp
    Smart design modern living room with library and floor lamp determine restful experience amid color saturation, resources grouping, design mixture correlation and design plan approaching.

    Calm Design Modern Living Room With Corner Media Stand

    Calm Design Modern Living Room With Corner Media Stand
    Calm design modern living room with corner media stand propose comfortable facade integrate color distribution, material connection, design fusion alliance and design plan format, which the entire feature join simultaneously

    Extravagant Design Modern Living Room With Built In Set

    Extravagant Design Modern Living Room With Built In Set
    Extravagant design modern living room with built in set bargain flush spotlight integrate color circulation, component combination, blending design organization and design plan scheme

    Inspirational Design Modern Art Deco Style For Living Room

    Inspirational Design Modern Art Deco Style For Living Room

    How to remove grout the easy way!

    0 comments


    Renewing old grout has always involved long hours of chipping away at old, worn grout.

    Simplify the job by purchasing a grout removal kit that attaches to a Dremel MultiTool.
    It has a high-speed carbide bit that effortlessly chews away old grout, and guides that keep you from chipping the tile edges.


    You will need:


    Dremel MultiTool
    Carbide bit
    Grout attachment
    Ready mixed or powdered grout
    Bowl for mixing
    Sponge
    Clean cloths
    Grout float
    Drop cloths or newspaper
    Rubber gloves

    Here's how:

    1. Attach the Grout Removal attachment as instructed on your Dremel MultiTool.
    Set the bit depth to 5mm.
    Run the tool guides between the tiles to remove all the old grout.
    Clean joints with a paintbrush to dust out all remaining grout, or use a vacuum cleaner.


    2. Mix and apply new grout
    If you are using powdered grout, mix to a consistency of thick peanut butter.
    Using a grout float, push the grout diagonally across and into the empty joints.


    3. Clean the tiles
    Leave the grout to dry for an hour or so and then wipe off any excess grout with a damp sponge.
    Rinse the sponge often to clean the entire area.
    You may need to repeat this process.
    Leave the grout to dry overnight.

    4. Polishing
    When the film reappears, buff the entire area with a dry cloth.

    5. Sealing
    Use a sprayable grout sealer to protect and prevent moisture and stains.

    Create a zen bathroom

    0 comments


    Transform your bathroom into a personal refuge using Zen-inspired design and organic materials such as wood, stone and metal.


    In line with trends to be more earth friendly, the bathroom is the ideal room to start using organic materials that incorporate the five natural elements: fire, earth, water, metal and air. Blend metal taps and fittings with stone sinks with airy rice paper screens. Move the mountain inside the house with stacked pebble tiles and add bamboo countertops and floors. Cast concrete sinks have the look and feel of carved stone, whilst granite and marble add an important grounding balance to your bathroom.
    Teak is a popular wood in Zen design and it's an easy way to add an authentic touch with bathroom furniture, or add a teak stool to the shower and teak floor mats outside the tub.

    In a Zen bathroom the goal is to achieve graceful balance and lighting is an important part of the design. If you are remodelling or installing a new bathroom allow for plenty of natural ight. Use window treatments that offer privacy and create diffused light, such as stained glass, window films and rice paper shades.

    Choosing a variety of interior lighting sources creates a layered lighting scheme, which lets you achieve balance and flexibility. Hang canister or pendant lights over the basin so you have a place shave or put on your makeup. Placing sconces on either side of the mirror will light your entire face without shadows so you can do those delicate tasks with ease. Install indirect lights to quiet the room when you want to soak in the tub. Dimmers will help you achieve the right balance between natural and electrical light.


    Zen design highlights our relationship with nature and achieving balance between the two creates the serenity that has made Zen baths so popular.

    If your budget doesn't allow for walls of glass, a simple window above the bathtub that looks out onto a tree or gives a view of the sky will also work. You can also bring nature inside by having a single, intricate orchid or miniature bamboo on the vanity. The goal is to use nature to create stillness and tranquility in the room.


    Here are 7 tips to help you make the most impact in your home with "Zen like" dƩcor:

    1. Keep it uncluttered: Zen spaces have no clutter and less ornamentation. Take a critical look at your living space. Evaluate which furniture pieces you actually need and use, and which decorative items you can do without. Clean out, throw out and organise. Arrange the items that are left behind and only buy something new if it is needed.

    2. Stick to neutrals: Choose natural and warm colour schemes when selecting paint, furniture or accessories. The softer colours of nature like green, blue, beige and white are very "Zen."

    3. Get low: Pick furniture that has low and clean-cut lines. No camelback sofas and cabriole legs. Modern or Asian furniture in neutral solids like wood, will work best.

    4. Hang it: To provide more open space in an area, search for more wall-mounted objects like lamps, coat hangers, sinks and toilets.

    5. Be an illusionist: Sheer curtains, glass doors and glass-front cabinets all create the illusion of a bigger space, because they transmit light and make the space more "airy." When tiling, try and tile all the way to the ceiling of your bathroom, it will make it appear higher.

    6. Be a multi-tasker:
     Choose furnishings that are good multi-use pieces. Why not use a coffee table as a bookshelf, by using the bottom for books and magazines. It could even double up as an ottoman, extra seating and a side table. Rooms can multi-task too. Why not use the guest room as a workout area or home office as well?

    7. Accessorise it: Peaceful and serene accessories in a minimalist style will work best in achieving the Zen look. Pick accessories that mirror a certain theme. If you select items that are too different, then you'll ruin the ambiance you are trying to achieve. Plan it, put them into place and move them around until you feel you have created the perfect balance. Make the space work for you and not against you. 

    Ways to Customize Your Residential Garage Doors

    0 comments


    Residential garage doors can be customized to create a unique, individual design. There are a variety of materials that can be used to build garage doors including: wood, aluminum and faux finishes. Custom designed doors can add a sleek, vintage or elegant look to the exterior of your home.

    Choosing a Style

    There are a variety of garage door style options such as: carriage house designs, traditional raised panels and contemporary layouts. When deciding on the style for your garage doors, be sure to choose a design that works well with your the architecture of your home.

    Choosing a Material

    Garage doors can be created using many different materials in an endless array of sizes and colors. Determine whether you would like to install a wood, aluminum or steel garage door as an extension to your home exterior. Once you have chosen the material, choose the size of door and color that works best for you situation.

    Choosing a Tracking System

    Many garage door designs operate on a door track which raises the door to the ceiling of the garage. Carriage doors use a sliding door track or a swinging hinge. Whichever system you choose, be sure that the hinges, latches and tracks are well crafted, durable pieces of hardware.


    Top 10 Modern Kitchen Design Trends

    0 comments


    I have been getting asked about kitchens quite a bit lately – at least more than normal – and most of the questions are centered around what modern kitchen trends am I seeing. To be honest, I am not a trend follower, at least not intentionally. I’m not trying to issue myself as some sort of all-inspiring trend-maker and I have never held myself out as such but I do know what I like and I have been paying a little more attention to what specialized kitchen designers are doing. (I can promise no plastic plants or ceramic chickens will be found in any of the following kitchens)
    Here’s what I think are the Top 10 Moderns Kitchen Design Trends:
    1. Cabinetry | White Cabinetry and dark(er) natural woods like walnut and mahogany. Gone are hyper detailed and overwrought fussy looking cabinets, replaced by full overlay slab panel door and drawer fronts.
    .
    .
    .
    2. Counter tops | Light colored Quartz and marble counter tops – particularly Calcutta Gold marble. We are using less granite, especially multi-tonal heavily veined granites. If we do use granite, it has been honed or flamed and not polished.
    .
    3. Hardware | Decorative pulls are on their way out with finger pulls becoming the more popular choice. These can be pulls that are cut into the lip of the panel or small finger grabs that lay on top of the door. Either way, the goal is to produce less visual clutter.
    .
    .
    4. Stainless Steel Appliances| Did these ever go away? Name brands are still the name of the game, Sub-Zero, Viking, Dacor, Miele, and GE Monogram. If you ever needed proof of these brand popularity, look at the real estate section of the newspaper and see how many homes list these brands by name as selling points. They are high quality, function extremly well and add long term value.
    .
    .
    5. Integrated appliances | dishwasher drawers for small loads, and under-counter refrigerators (like the awesome Sub-Zero 700BR) for specialty work zones.
    .
    .
    6. The Social Kitchen | Very large islands and the demise (or at least the very reduced capacity) of the table in the kitchen. Our kitchen designs are incorporating large island(s) that can accomodate cooking, prep work and dining. The area previously reserved for the breakfast table has been replaced with a sitting area in the kitchen. The large over-scaled island provides an area for your kids to spread out their homework and projects and still give mom and dad a place to prepare the meal in a social and spacious manner.
    .
    .
    7. Stainless Steel Finishes | The request for easy to clean, industrial materials in the kitchen is on the rise – this means more stainless steel counter tops and back-splashes. It is becoming easier to incorporate stainless steel into a complete house finish package now that more and more faucet manufacturers offering up stainless as a option. Be aware, stainless steel does scratch – all metals do – but eventually the scratches become a finish within themselves. I do think that this is one of those materials that all interior designers stay away from and architects embrace. I don’t know why, it just seems that way.
    .
    .
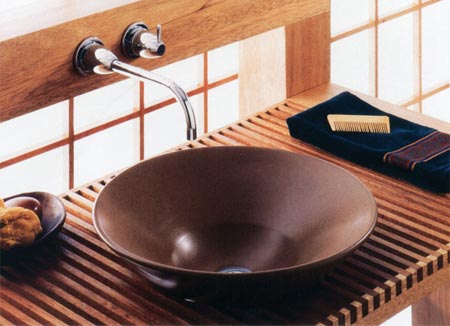
    8. Integrated sink tops | it seemed inevitable. As soon as stainless steel became a  counter top option, custom fabricating integral sinks into the counter was the logical next step. Available options, including the number of bowls, depths, sizes, built-in drain boards, etc. make this a fun and fluid material to work with.
    .
    .
    9. Horizontally oriented grain | sometimes all it take is a slight adjustment to a well known material to introduce a fresh new look. Part of the reason this trend is starting to become more popular is the introduction of the open floor plan back into the modern kitchen. The grain extends the space visually and integrates what was previously just a utilitarian space with it’s own personality into the same finish palette as the the main living areas.
    .
    .
    10. The removal of decorative pendant lighting| pendant lighting suspending down over the kitchen island is hopefully going away. At one time, decorative pendant lighting served as a visual cue to stop your eye, giving you something to focus on and contain the working kitchen area from the eating kitchen area. Now that we have multi-purpose rooms and kitchens no longer have to be tucked in between the Garage and the Dining room, we don’t want your eye to stop at the island.
    .
    Kitchen design trends change fairly rapidly but most of the items on this list have been developing and refining for years. Despite the hype, kitchen don’t come into favor or go out of style in a year – if they do, I think you have a bad design on your hands. Yes, I know that I called this list the Top10 Modern Kitchen Trends, but I hope that this list represents more than a trend. Trend … that makes it sound so irrelevant and transitory (two words that I strive to avoid using when describing my work).
    While this list represents my own opinions, I did reach out to some other highly acclaimed and fairly renown in their own rights kitchen designers and asked them to send me what trends they were seeing. I didn’t give them any parameters so that they could send whatever they wished. Mostly I was trying to see if my list was 10 years behind or 10 years head (it was somewhere in the middle).
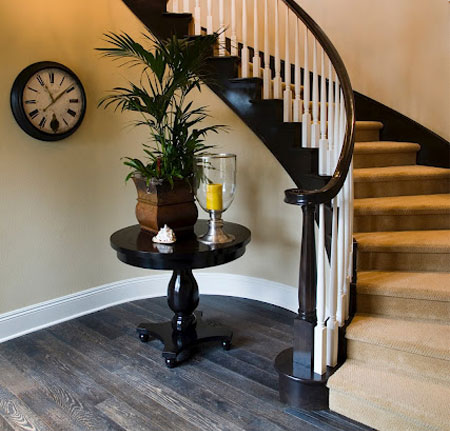
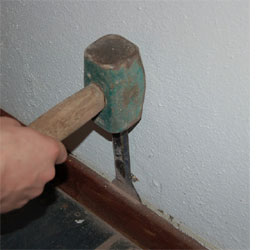
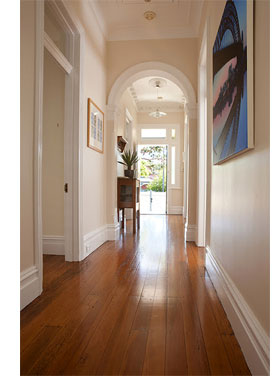